Allion Labs | Larry Chen
After reading our introduction to the concepts and theories of Incoming Quality Control (IQC), we will now show some of the common IQC issues that we encountered during production in the past, giving our readers a better understanding of the role of IQC in quality control and the features of Allion’s IQC services:
Case Studies of Frequent Issues
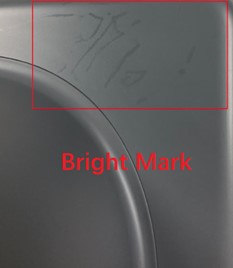
Issue 1 – Back Cover of the Video Equipment Console has Bright Defects
Action Item
By following the appearances quality guidelines, we conducted the inspections and saw that every sample had bright defects, making this a rather serious problem. To satisfy production requirements, we divided the bright defects into three categories: severe, medium and light. After assessments, we confirmed medium bright defect to as “limit sample”, and asked vendors to do sorting treatment first.

Sampling Rate/Fail Rate
Gray: F/R=970F/1087T=89%
White: F/R=26F/255T=10%
Value
Assists our clients in finding defects undiscovered by suppliers as well as potential defects from the transportation process. Such defects should be limited before mass production in order to prevent end users from encountering defects and generating customer complaints. We provide realistic and feasible suggestions for inspecting original product specifications or measures, based on the severity of the defect situation and the demand for production and shipment from production lines, in order to solve short-term production and shipment demands.
Root Cause
After comparing shipment inspection records with suppliers, they were able to 100% confirm that these parts did not have such defects when they were shipped from the factory. They believe that such defects were caused by interactions between the products’ baking finish, the low-density polyethylene (LDPE) bags and the designs of retail packaging (caused by with the plastic bag’s anti-static material sticking to the surface of the product). The baking finish then interacted with the bag under such conditions, thereby creating these marks. After comparing the delivery time, we discovered that this batch was shipped during a period under high temperature in summer, while other defect-free batches were shipped under lower temperatures. Therefore, we believe that the problem was primarily caused by long-duration transportation time under high temperature and high humidity.
Solution
After discussing the matter with suppliers/brand retailers, we suggested that suppliers should replace the LDPE bags with normal HDPE plastic bags to avoid such problems. The HDPE materials are more heat-resistant, which should be able to avoid recurrence of the problem. After new packaging was implemented, we inspected all the 100 samples of the first batch, with a fail rate of 0%, which proved the efficacy of the solution. We also asked brand retailers and suppliers to consider this measurement point for QRS reference for similar models in the future.
Issue 2 – Scratch Found on Lens Ring
Action Item
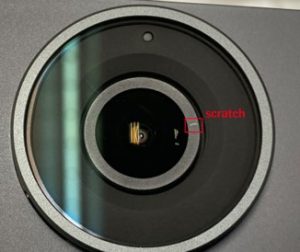
- We confirmed that the scratch defects were as follows, with both types exceeding the existing appearance quality guidelines
Scratch# 1 S=0.3~0.4mm²
Scratch# 2 S=0.15~0.2mm²
We immediately sampled additional 20 pieces, and discovered that 1 piece had similar scratch defects (Scratch# 3 S=0.25~0.3mm²), which still exceed the requirements of our guidelines. After preliminary testing, we determined that such defects did not affect the product’s function, while actual operation showed that the defect did not affect the product. However, we still asked suppliers to perform FA analyses, and discussed with brand retailers to see whether or not to do the rework or modify the existing appearance acceptance guidelines for such defective products.
Value
We comply with our appearance inspection guidelines, to assist customers in finding defects or parts that were not discovered by suppliers or if there is any omission in specifications, so that such matters can be discussed earlier. We also regularly update our existing standards to fit the shipping demands of our customers while also inspecting the actual impacts of defects on product operations.
Solution
The assembler replied that these types of scratches are within acceptable standards for the lens’ original supplier, while the supplier guarantees that these types of scratches do not affect imaging quality. We sampled 5 pieces and tested sharpness as well as imaging by means of test charts, and then verified their claims that such defective appearance did not cause any poor influence on images. Furthermore, the suppliers also stated that the transportation and inspection costs will substantially increase if the acceptance standards are required to be stricter, which are unfavorable for product market competitiveness. Therefore, after discussing with our clients, we decided that the acceptance standards for such materials should be listed within the inspection guideline standards; no rework is required.
In addition to common issues regarding assembly lines, let’s talk about several kinds of more serious IQC issues:
Case Studies of Rare or Major Issues
Issue 1 – Appearance of White Spots on Video Equipment Console Panel
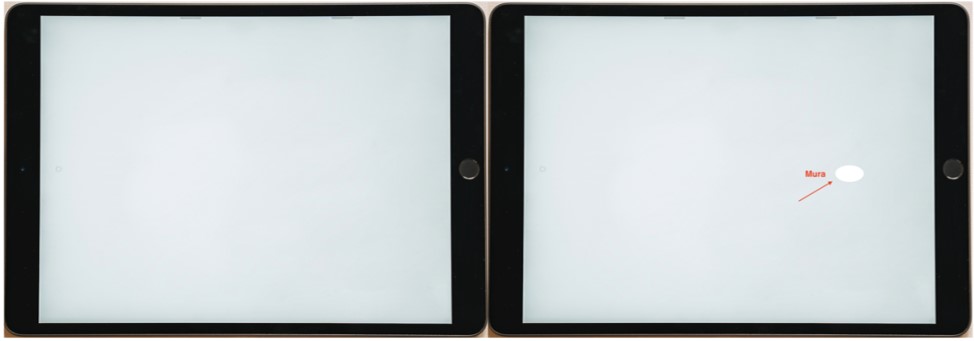
This affects users’ visual experience during operations. Not only functional problems should be deemed major problems, such white spots on the panel will also give users poor experience.
Sampling Rate/Fail Rate
After a 100% inspection, 334 out of the 520 models in the batch were found to have issues with white spots. The issue occurrence ate was 64.23%).
Value
Helpful to clients in finding critical issues that the supplier did not discover, even though the product has passed quality inspections from its producers. However, when Allion’s IQC on-site personnel were performing inspection patrols, they still discovered abnormalities. After they asked for the inspection of five machines, they discovered that four out of the five suffered from similar conditions. After discussions with superiors, they decided that 100% of the batch should be inspected. .
Root Cause
- Stress concentration of plastic resin around the gate at the bottom behind the touch controller, causing the location to warp.
- In addition, the product’s mechanism design creates tendencies to curve, causing the warped area to jut onto the back area of the LCD, thereby creating discolored patches.
- A gap of only 0.3mm between the gate area and the LCD in its design. As the shell curves, the gap is reduced below zero in some circumstances, creating pressure at the back of the LCD. This creates a pressure greater than normal, with blotches/spots as a result of pressure on the panel.
Solution
After discussion with senior institute RD at Allion, we recommended that the production line use new tool support frames with shorter screws on its boss and produced ten models for inspection. None of the ten new models showed abnormalities, which proved that the new tool support frames can effectively avoid gate malformation and structural curving. After we submitted the results to our client and after receiving their consent, we further produced 300 models and performed inspections on them, but no issues were found. The success of our IQC service saved our clients from the costs of product recalls and customer complaints while also improving their product reliability and brand image.
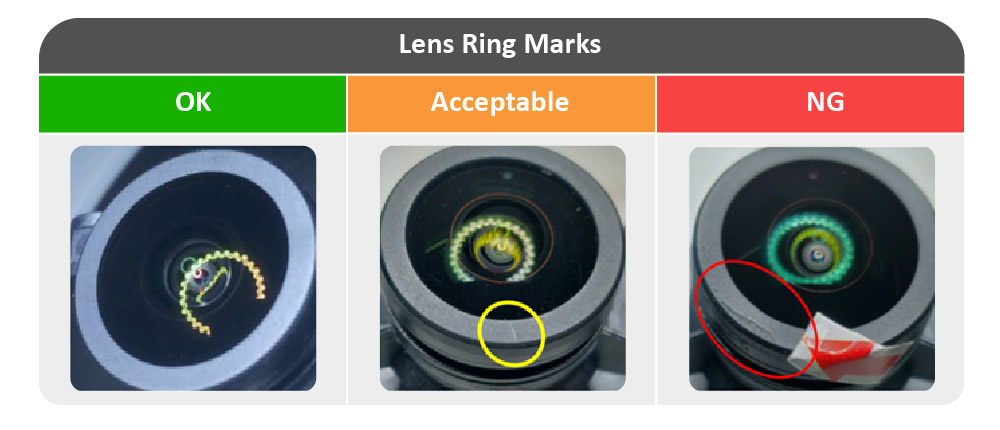
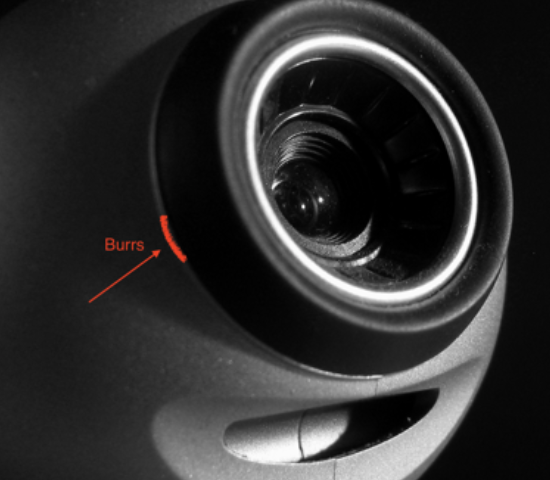
Issue 2 – Stubs (debris) attached to the recess area of the mirror ring
Sampling Rate/Fail Rate
After a 100% inspection, 17 out of the 550 models in the batch were found to have issues with stubs (debris) (issue rate of 3%). This is already a relatively high fail rate.
Value
- Using the existing Outgoing Quality Control (OQC) of the supplier to examine the Standard Operating Procedure (SOP), we could only find easily-noticeable surface damages, but could not find the source of this issue. After reviewing the supplier’s own inspection SOPs, we discovered that they only focused on noticeable damage and function issues, without inspecting surface details such as seams, bottoms, etc.
- We assist our clients in discovering critical issues not found by the supplier, without damaging the appearance of the product. A camera is a high-precision product that does not allow for any impurities or foreign residues. The reason is that these residues can all potentially scratch the front lens during shipment of finished products, causing actual function issues and creating a negative brand image.
Root Cause
Manufacturing process negligence. The manufacturer did not define inspection standards and procedures for product appearance, resulting in the OP performing inspections for it.
Solution
After obtaining the approval from the brand retailer, Allion assisted the supplier in setting up inspection standards for samples for inspections by the OP. Each shipment had to pass a 100% OQC inspection by production line OP before it could be shipped. This prevents defective products from being released onto the market for fear of increasing costs in the form of recalls and customer complaints.
For information of IQC services, please contact us through our contact form or by email.


